benlong


Pallet Load Configuration Pattern Optimization: Schema, Layers and Units per Layer
A person should understand that one pallet can provide the answers to three things: how many packages (or units) are in one layer; how many layers of packages (or units) make up the pallet; and finally where’s the pallet located in the truck/trailer. Answering these three questions correctly allows for loading a greater amount of product onto each truck; less rejections at receiving docks; and avoids paying people to restack pallets at 2:00 A.M. If the person answering these questions got them wrong, they can still have an excellent visualization of what is happening on the HMI until such time as the load starts to move down the first curve – at which point they will figure out what the lingo is, what type of geometry is behind it, what their complete view of the situation is, and what potential optimization opportunities exist regarding cases per pallet.
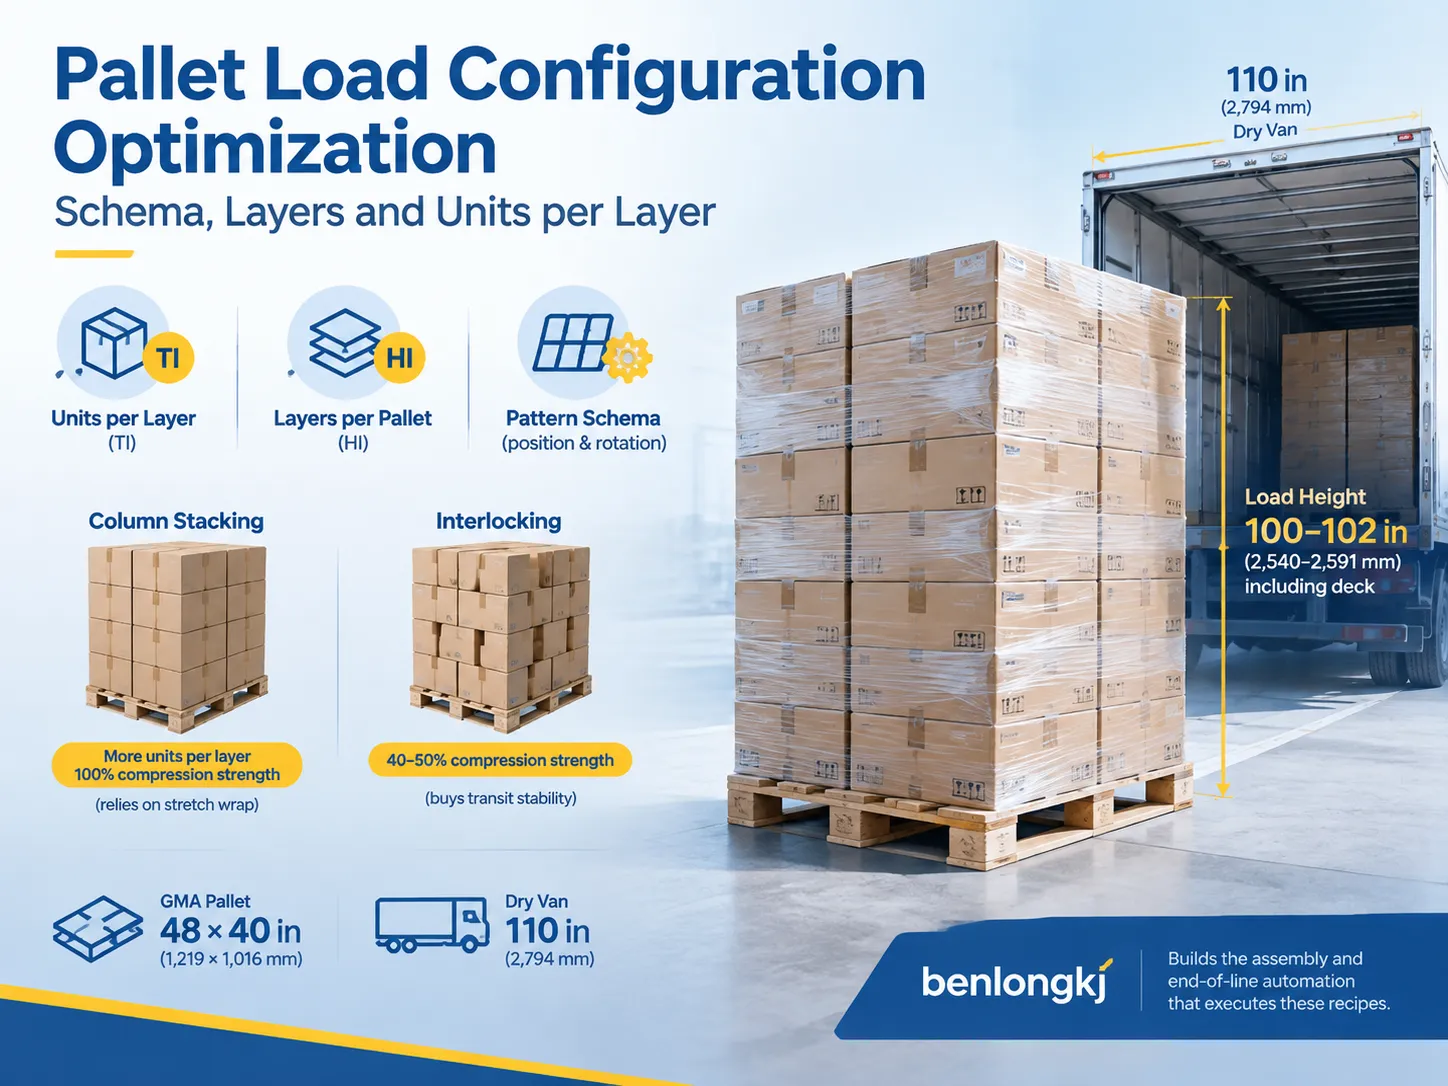
When optimizing how you build pallets, you need to consider 3 factors; units per layer (which is often referred to as “TI”), layers per pallet (which is sometimes referred to as “HI”), and what type of stacking pattern you will use to stack the pallets. By stacking your pallets in columns, it is possible to maximize the total quantity of units in the pallet layers and provide 100% package support using stretch wrappers, but using interlocking methods does not provide as good of package support with interlocking being limited to approximately 66% of your theoretical maximum package support. If you are working with a typical 48″ x 40″ GMA pallet size, and the pallets must fit inside of a 110″ van, then the total actual height of the loaded cargo must be approximately 100″ to 102″ plus the height of your pallet on top of the cargo.
TI and HI: the two numbers your customer already speaks
Each of the various forms of warehouse paperwork — routing guides and pallet configuration charts — carries the same code: TI × HI. TI refers to the number of items in a single layer (cartons, trays, pails, bags, shrink-wrapped packs), while HI refers to the number of layers on the pallet. Computing TI and HI produces the total number of units in the shipment, which is the unit of measure the distribution center uses to confirm that the shipments match the purchase orders without checking any box of the shipment.
For instance, if a pallet reads 16 × 4, it means there are 64 units in the shipment; a pallet reading 10 × 5 consists of 50 units. Although two pallets may look very much the same, they may constitute cargo quantities that vary considerably, and that change is directly reflected in freight costs. For this reason, experienced engineers consider TI and HI being design criteria and not mere measurements; for instance, if they make a half-an-inch adjustment in the master carton, they get four extra units per layer.
Finally, note that TI and HI show only quantities and not shapes. Two shipments with identical readings (12 × 5) may vary significantly when transported, depending on whether the cartons are loaded edge-wise or rotated on every layer.
What a pallet load schema actually contains
If you are defining a new line, creating a simulation model, or filling the robot’s recipe chart, all you have is the image of the design. Therefore, you need a set of data that describes loading fully and facilitates the two departments in making the same pallets.The twelve fields that follow are the minimum set, and they are also the reason a production line scoped before the carton footprint is frozen tends to need rework once real cases arrive off the corrugator. A practical schema for a single SKU looks like this.
| Schema field | What it records | Typical value |
|---|---|---|
| Pallet footprint | Deck length × width, and format | 48 × 40 in (1,219 × 1,016 mm) GMA; 1,200 × 800 mm EUR |
| Deck height | Pallet thickness, added to the load height | 5-6 in (127-152 mm) |
| Unit dimensions | Length × width × height, as stacked (not as erected) | 12 × 10 × 10 in (305 × 254 × 254 mm) |
| Allowed orientations | Which rotations the unit may take (0° / 90° / 180° / 270°) | 0° and 90° only |
| Units per layer (TI) | Count in one complete layer | 16 |
| Layers (HI) | Count of layers built on the deck | 4 |
| Pattern family | Column, interlock, pinwheel, split-row, spiral | Interlock, odd/even |
| Overhang limit | Maximum unit projection past the deck edge | 0 in (flush) to 1 in (25 mm) |
| Interlayer media | Slip sheets, layer pads, glue dots, none | Slip sheet every 2 layers |
| Unitisation | Stretch wrap turns, banding, corner boards | 3 base wraps + spiral to top |
| Height ceiling | The governing limit, whichever is lowest | Trailer 110 in; rack beam 96 in |
| Weight ceiling | Pallet rating and carrier preference | 2,500 lb max; 2,000 lb preferred |
Complete those twelve boxes and a packing cell, a manual team or an external storage facility will form precisely the same load. Omit one — oversize is the common victim — and you have a load that fulfills the number on the documents while failing on the truck.
The five pattern families, and what each one costs
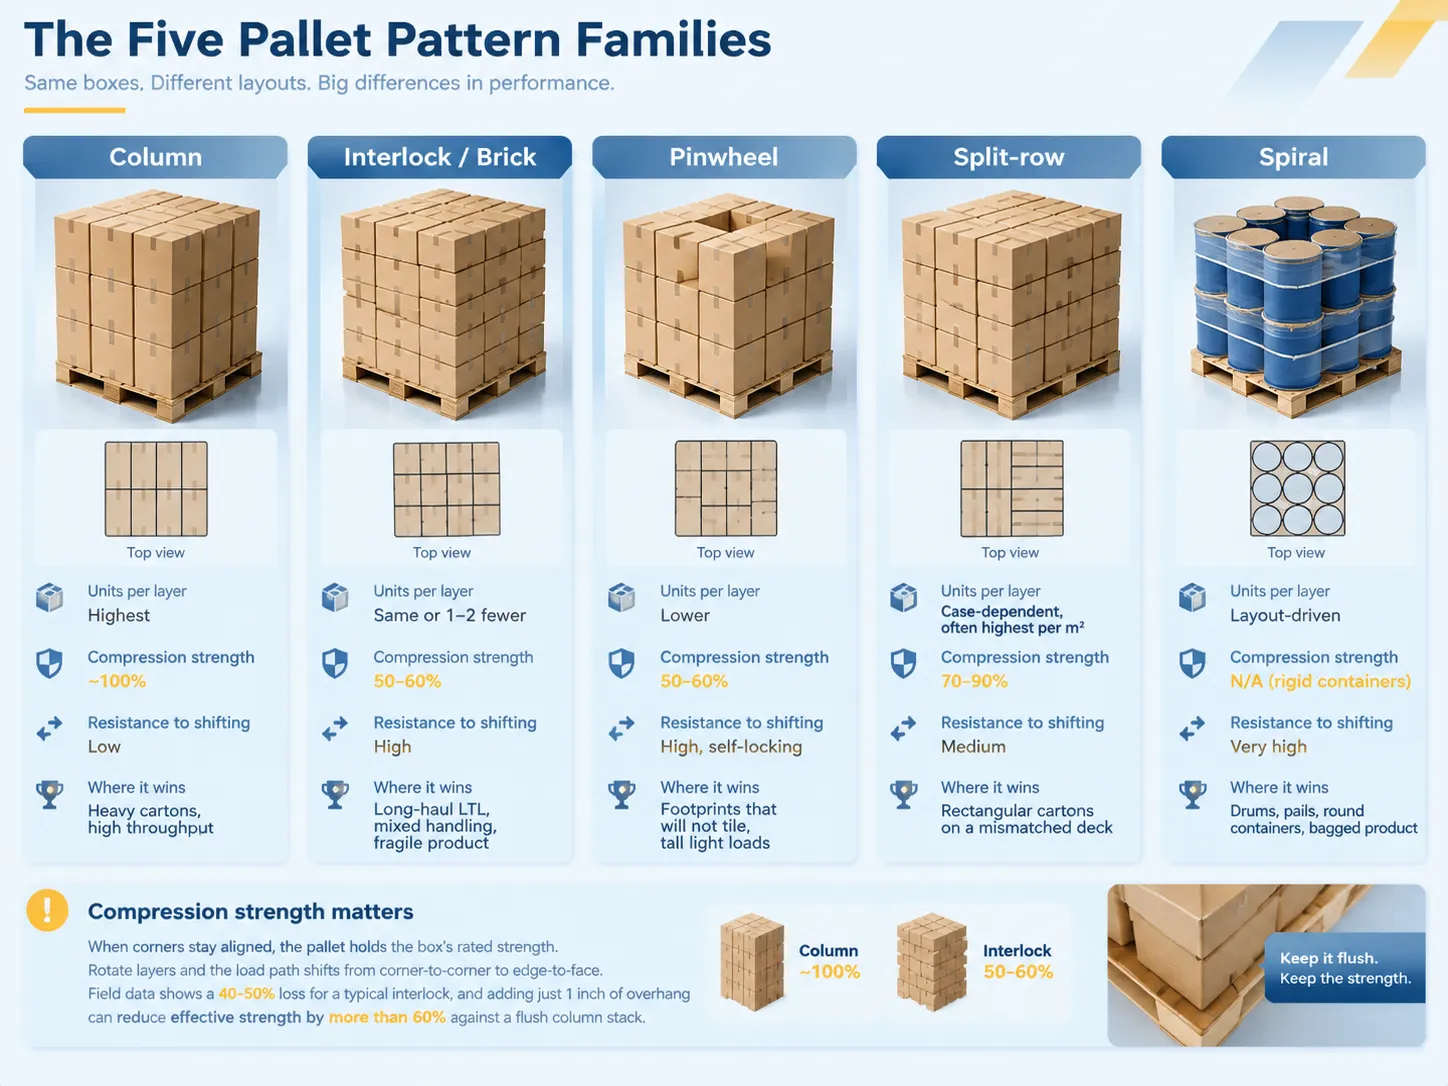
In fact, nearly all pallet designs can be classified into five categories. In column stacking, the same layer is stacked continuously throughout the whole height of the pallet. In interlocking pattern (also referred to as brick pattern), layers of boxes are rotated by 90 degrees with every alternate layer in such a way that the corners of boxes from different layers are locked together. The pinwheel pattern designates the arrangement of boxes around an empty spot in the center of the layer that is needed for units that have an odd shape. The split-row pattern implies stacking boxes in a different way than boxes in the previous layer. The spiral is suitable for pallets with round boxes or packages.
| Pattern family | Units per layer | Compression strength retained | Resistance to shifting | Where it wins |
|---|---|---|---|---|
| Column | Highest | ~100% | Low — wrap-dependent | Heavy cartons, short supply chain, high throughput |
| Interlock / brick | Same or 1-2 fewer | 50-60% | High | Long-haul LTL, mixed handling, fragile product |
| Pinwheel | Lower | 50-60% | High, self-locking | Footprints that will not tile, tall light loads |
| Split-row | Case-dependent, often highest per metre of deck | 70-90% | Medium | Rectangular cartons on a mismatched deck |
| Spiral | Layout-driven | N/A for rigid containers | Very high | Drums, pails, round containers, bagged product |
One must stress the compression figures because those are matters that people do not take seriously. When carton corners remain in alignment, they bear the load in a direct manner and thus, it has the compression value mentioned in the box certificate. Layer rotation changes the load path from corner to edge and thus, according to field data, losses amount to about 40–50% for a classic interlock. And this is compounded. Add just one inch of overhang to an interlocked load and effective strength of this load can fall by over 60% as compared to a flush column stack. For example, if your stack consists of 8 layers of boxes rated for 400 lb, then this is the difference between a safe delivery and a squashed layer at the bottom.
How units per layer is actually calculated
It is simple arithmetic, but the restrictions are more complicated. Take a 48 × 40 inch deck and a 12 × 10 inch footprint. First, divide 48 by 12 to determine the length (4), then divide 40 by 10 to determine the width (4). This means you can fit 16 units in one layer, and if there are 4 layers at 10 inches, you would have 64 units at 40 inches.
Now the tricky part. There is no nice way to divide the 48 with a 13-inch footprint. So, either you must let the deck waste 2 to 5 inches (51 to 127 mm), allow for overhang, or rotate the deck. If a carton is rotated 90°, this makes a difference in the count. An interlocked layer requires solving the odd and even layers differently as it is not the same problem anymore.
| Constraint | What it does to units per layer | Practical rule |
|---|---|---|
| Overhang beyond the deck | Adds apparent count, removes real strength | Cap at 1 in (25 mm); up to 32% compression loss |
| Underhang (product inside the deck) | Wastes cube, lets the load lean | Keep flush on at least two opposing sides |
| Unsupported gaps between deckboards | Reduces bottom-face support on the base layer | Base layer must span boards, not bridge gaps |
| Bag or tray deformation | Breaks the assumed footprint | Use layer pads; do not model the nominal dimension |
| Label orientation requirements | Forces a rotation, may drop the count | Confirm before the pattern is frozen |
Where the layer count really comes from
HI gets determined by whatever limit shows up first. There are always at least three of them. The trailer has about 110 inches (2794 mm) of inside height; deduct clearance, load bars, and the floor height, and the effective load height you’re working is going to be between 100 and 102 inches. Racking may be even narrower — a 96 inch (2438 mm) high rack is standard, which is why loads that may fit easily in the trailer may not make it to the very first storage point. The weight closes the loop from the opposite side — having a nominal pallet capacity of 2,500 pounds (1134 kg) is the maximum capacity, and most carriers prefer to work with cargoes weighing up to 2,000 pounds (907 kg).
So, divide the available height by the unit height, round this number down, and compare it with the weight parameters and routing requirements of the retailer. There are distributors that have 48 inches (12 inches deck height included) as their hard height — it is stricter than anything that the trailer can offer. If the pattern passes inspection without that compliance check, it is going to be wrong despite the fact that the calculations are accurate.
Optimization levers that beat pattern fiddling
Teams spend weeks refining patterns when the bigger prize sits one level up at the carton. Moving a master carton from 12 × 10 in to a footprint that tiles the deck properly can take a layer from 12 units to 16. That is a 33% improvement in pallet density, and it applies to every pallet the SKU will ever generate. Half an inch of carton width can be worth more than any amount of software tuning.
Above the carton, the gains come from unitisation and handling design rather than geometry: slip sheets between layers to spread load and cut deformation, glue dots to stop the top layers walking, properly applied stretch wrap with at least three base wraps gripping the deck itself, and corner boards on loads over 36 in. Those are stability measures, not count measures, but they are what lets you keep a higher count without paying for it in damage claims. Automation changes the economics here too, because automated handling of the carton between labelling and palletising lets you hold a specific base-layer orientation and a specific wrap tension every single cycle instead of whatever the shift happens to do.
The throughput cost of a better pattern
Choosing the right pattern is important for both cycle time and stability. The most efficient pattern a machine can perform is that of column stacking, because all layers are identical and hence the movement is the same. Interlocking requires two sets of coordinates and motion programs, hence robotic cells have to deal separately with odd and even layers. In the case of a traditional layer palletizer, patterns based on columns can work almost at the same speed as its maximum speed; interlocking patterns are slower by a value that is a factor in every cycle.
However, it is the type of machine that is even more important than the pattern specification. While a robotic palletizer cannot exceed 10 cases per minute and less than 20 kg per pick, a traditional palletizer can perform up to 28-30 cycles per minute in practice at a drop under 12 cases per layer. Layer-handling machinery is the fastest at placing full layers, and it takes only 2 to 5 minutes to change over from the full layer load of cases to other types of loads against 18 to 58 minutes for a traditional palletizer.Where the line is judged on output per shift rather than on cases per pallet, a slower pattern costs more than the three extra cartons are worth.
What automation changes about pattern optimisation
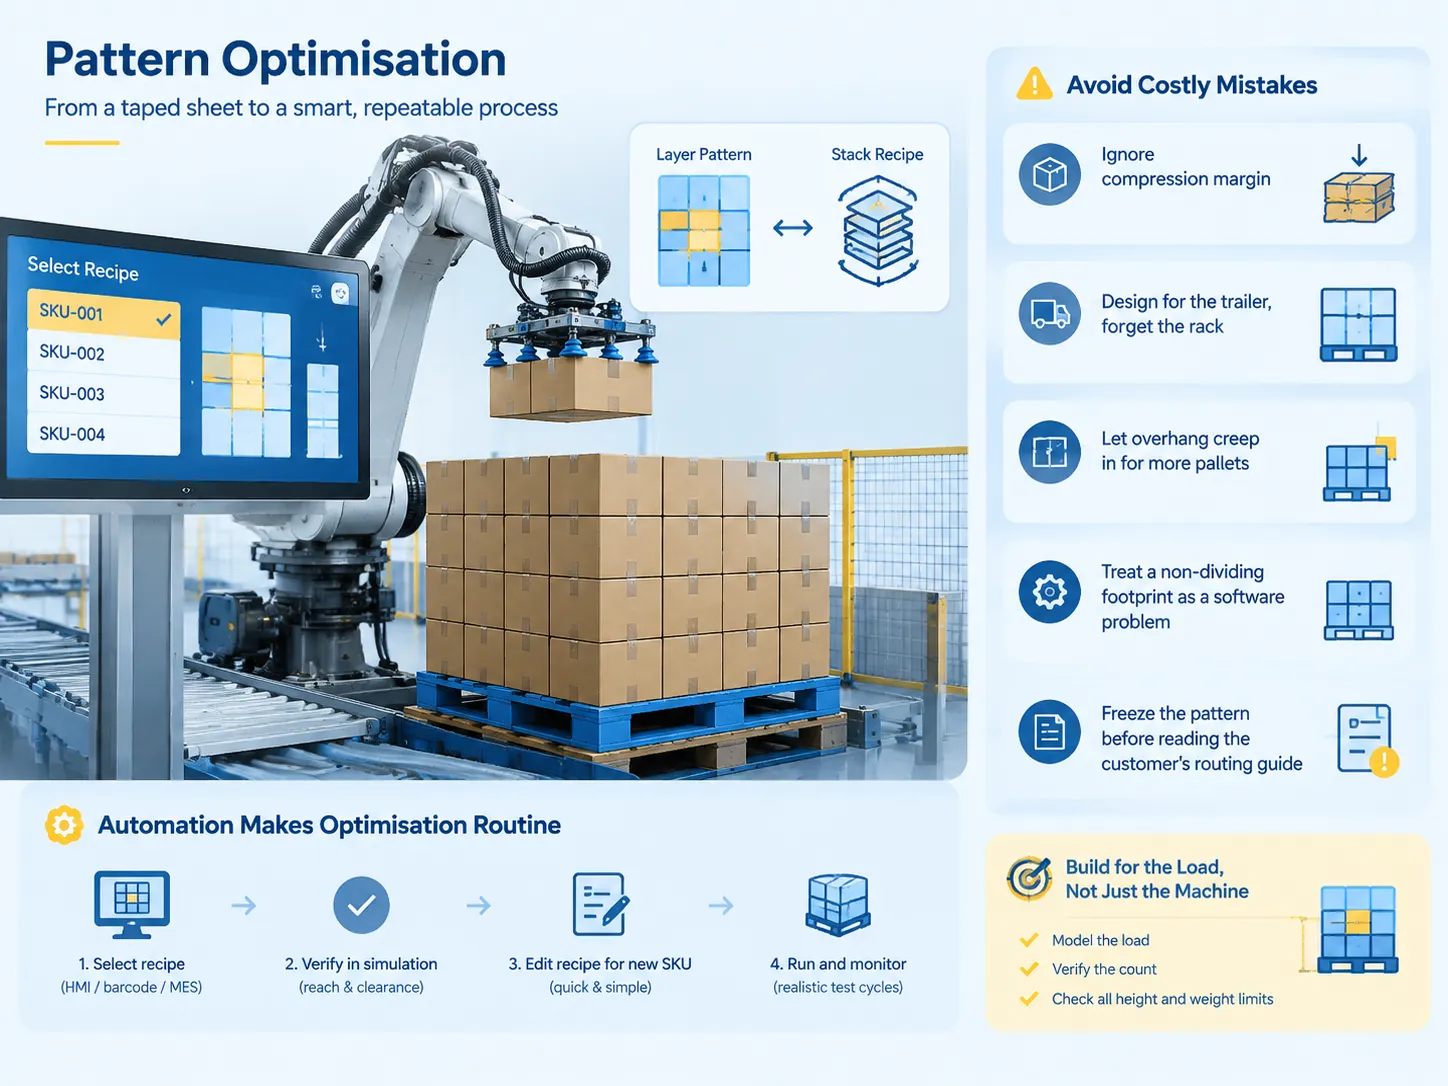
When the patterns exist as instructions and not as just a printed paper glued to the machine, optimization becomes part of a process rather than a one-time operation. A layered pattern exists in the system in the form of a placement database obtained from the dimensions of the units and the platform size. The recipe contains information about the way layers interleave, rotate, and change position. It is the operator who picks a recipe via the HMI, or it is automatically selected by machine depending on the barcode or system information.
There are three things that could be implemented to make such a system more efficient. First, it is important to check whether the layer can be reached in offline simulation before the workstation is created. A pattern that cannot be reached in the eighth layer is a mechanical issue and not a programming one. Second, it has to be confirmed that under the conditions when a new SKU is added to the system only a recipe adjustment is necessary. It has to be established who is in charge of it. Lastly, it is important to keep pattern testing realistic when evaluating the edge support, as testing a pattern that was done with ideal packaging and then testing it with overfilled or swollen boxes will lead to some placement problems, which will be perceived as issues with the robot.
Configuration mistakes that cost real money
The costly mistakes are repeated. Improving layers per pallet without checking the compression limits, thus the shipment is in good condition, but the bottom layer is deformed. Designing for the trailer instead of for the rack. Making allowances for some overhang to meet a pallet quantity requirement. Considering a non-separating footprint as a software problem instead of a packaging problem. Finalizing a pattern before reading the customer’s routing instructions.
There is also a more complex problem: creating a pattern that is suitable for the machine instead of the load. A pattern that is suitable for the grippers, but has the center of gravity of the load too high makes it looks good at the end of the process, but fails on the trailer. The solution is not particularly exciting — create a model for a load, check the quantity and compare it with all possible height and weight restrictions, and only then tune a machine.
How benlongkj fits into this picture
We should be straight about where we sit. benlongkj builds automated assembly systems, injection moulds and dedicated production lines — including MCB automatic production lines that take a breaker from moulding and assembly through testing and packing.In the start-up position, we are not a palletizer manufacturer, nor do we offer a software for optimizing the patterns. Instead, what we provide in the framework of our service is the design of industrial manufacturing sequence, which involves the processes of accumulation, orientation, labeling and inspection, concerned with product introduction into palletizing.
This is very important to highlight, as normally it is the palletizer that gets blamed for the failure of pattern, while in reality, the reason for the failure is somewhere far upstream. When cases arrive rotated by 15°, overfilled, or with the label facing the wrong side, there is no pattern which can help it. The majority of our work is aimed towards the creation of a consistent input so that good recipes can be effectively implemented.
FAQ
What do TI and HI mean on a pallet pattern sheet?
TI refers to how many units are found in one layer and HI denotes how many layers are present on a pallet. A 16 × 4 configuration will result in a total of 64 units. Both numbers must be provided in the spec sheet or routing documents because receiving warehouse checks the load versus these numbers without breaking the stretch cover.
How do you calculate units per layer?
Use the measurement of the deck length divided by the unit length, and the same for deck width and unit width, and then multiply the two resulting numbers. For instance, the case of a deck of 48 × 40 inches and a carton of 12 × 10 will give 4 units along the length and 4 units along the width — thus totaling 16 units. In cases where the unit does not fit evenly in the deck, one must decide between losing parts of the deck, allowing the unit to hang or placing an alternate row.
Is column stacking or interlocking better?
If it is specifically compression strength and cycle time that becomes the primary concerns, column stacking can be performed. If the load is required to endure long-range transport, interlocking should be used at this point. It is worth noting that interlocking requires around 40% to 50% of the carton’s compression strength because corners are not aligning anymore, thus this is not the right choice for heavy products shipped long distances and have good wrapping.
Can a palletizing robot handle more than one SKU on the same pallet?
Certainly. The use of mixed-SKU and rainbow pallets is commonplace in today’s automated recipe-driven cells; the machine software has the potential to handle as many products as required. Therefore, the medium allows for the limited possibility only in terms of tooling since a vacuum pad for boxes cannot pick a pouch.
Does the pallet pattern affect freight cost?
In straightforward terms, dimensional weight and pallet density give rise to carrier charges being levied based on either actual weight or dimensional weight, whichever is greater. In essence, the more dense the pallet, there will be fewer shipments for the same level of product load. From 12 to 16 units per layer entails a 33% increase in density optimization compared to the same trailer size.
References
- ISO — ISO 3394:2012 Dimensions of rigid rectangular packages
- NIST — Handbook 44, Specifications, Tolerances and Other Technical Requirements for Weighing Devices
- UL Solutions — Pallet and unit load test standards
- ASTM International — D4169 Standard Practice for Performance Testing of Shipping Containers and Systems
- US EPA — Pallet reuse and wood packaging guidance
- MHI — Unit load and palletizing reference material
Conclusion
Although the design of a pallet load is not a part of the shipping process, it is imperative that the design is evaluated against both the pallet layout and the measures taken for the design’s protection before the final design is defined. They should be taken into consideration before arriving at the final design plan. Faced with the decision on how to arrange the pallet, the user must decide on one of the two pallet configurations available, namely, a column configuration and an interlock configuration. The two configurations differ in their respective compressibility and the construction and dismantling time. In this regard, the first step in the entire process is to measure the shipping carton placed on a pallet. A properly sized shipping carton will yield better results in the process than anything else. Therefore, it is also essential to see whether the shipping carton is compatible with the required load configuration.