benlong


How to Test a Circuit Breaker
Whenever there is a tripped circuit breaker which cannot be reset or when a light flickers repeatedly when an air conditioning system is turned on, one is left wondering if there is anything wrong with the circuit breaker; or what is causing this issue. The only way to determine whether or not a circuit breaker is bad is through circuit breaker testing. If you are an electrician making a service call, you can complete this testing procedure using both a multimeter and visual inspection within five (5) minutes. If you are a manufacturer producing thousands of circuit breakers daily, the same testing procedure is performed on every single circuit breaker through an automated line before they leave the manufacturing facility. The following guide will provide you with the tools necessary to: test a circuit breaker outside of the manufacturing facility, identify indicators of a faulty circuit breaker, and understand how quality testing during the production process will prevent faulty circuit breakers from ever being installed into a panel.
Why Testing a Circuit Breaker Matters
The job of a circuit breaker is to safely carry its rated current, and if there are conditions that cause the circuit to carry more current than its rated value, the circuit breaker ensures that power to the circuit is opened when necessary. The internal contacts of a circuit breaker may be pitted with time; the bimetallic element may shift out of alignment; and the tripping mechanism may be sluggish. Breakers that appear to be fine externally may no longer trip at or near their nameplate ratings, or may trip too easily, resulting in nuisance tripping and outages. Testing verifies that the circuit breaker is still functioning according to its nameplate specifications. According to the Electrical Safety Foundation International (ESFI), faulty circuit breakers contribute to many residential electrical fires; therefore, periodic testing is an important part of any reliable electrical maintenance program.
Step by Step: How to Test a Circuit Breaker with a Multimeter
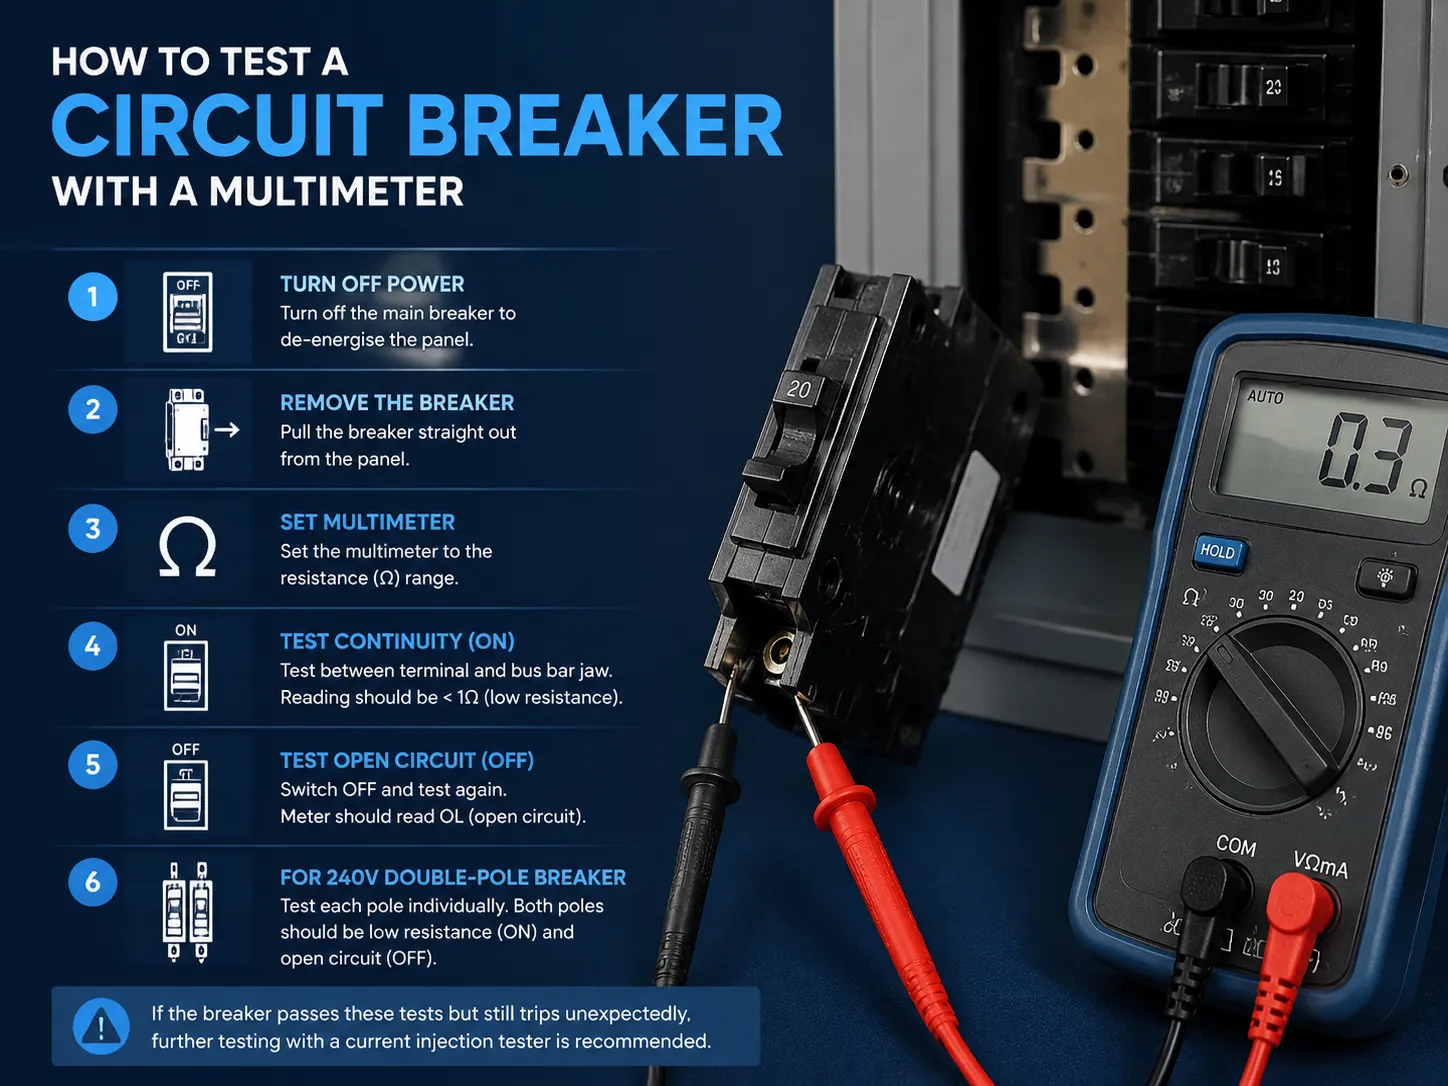
Circuit breaker testing in a panel is a very methodical process that takes time and tools to complete. The most commonly used field test for circuit breakers has a digital multimeter (DMM) to measure continuity and resistance; this will be performed by either a skilled DIYer or an electrician.
- Turn off the main breaker to de‑energise the panel. It is not advisable to touch the live lugs coming into the branch breaker because they will still be producing electricity when you are performing your test. Make sure you confirm that they are producing electricity prior to conducting your tests, using a non-contact voltage tester.
- Remove the suspect breaker from the panel. Use an outwards motion (from the middle of the panel) to break it free from the incoming busbar. The electrical panel will not move freely, so if you cannot move it at all you should check for some type of retaining clip or mounting screw.
- Set the multimeter to the resistance (Ω) range. A low range, such as 200 ohms, works best.
- Test continuity in the ON position. Using one lead, contact the terminal (where the circuit wire attaches) of the breaker, and then contact the bus bar jaw (the place where the bus bar attaches to the panel) with the other lead. If the breaker handle is in a closed position (ON), the meter should read low resistance, usually less than one ohm. Any fluctuating readings or readings above just a few ohms will indicate contact wear/pitting internally on the breaker itself.
- Test for open circuit in the OFF position. Turn the circuit breaker handle to OFF position and take the new measurement again. The multimeter should read OL – Open Circuit. If you have any measurable resistance with the breaker in the OFF position, it could be due to a welded contact or a carbon track, and the breaker will need to be replaced.
- For a 240‑volt double‑pole breaker, test each pole individually. The independent switch found on each pole will operate separately from each other; therefore, test the left pole (its load terminal to its bus bar jaw) and the right pole independently from each other. Each pole should measure close to 0 ohms in a closed position (i.e., ON) and open circuit when in the inactive position (i.e., OFF); therefore, if either side of poles fails, the entire circuit breaker will need replacement.
If the circuit breaker has passed the resistance tests, but you suspect it is tripping at an inappropriate current level, you will need to do more sophisticated testing using a current injection testing device. This testing is usually done by electrical testing specialists or industrial maintenance teams. Resources from Fluke Corporation provide detailed guidance on using a digital multimeter for relay and contactor testing, and the same principles apply to circuit breakers. If any of these procedures are uncomfortable, or if the panel is an older, suspect brand, calling a licensed electrician is the safest path.
Testing for Voltage Under Load: A Live Test with Caution
There are a few types of utility breaker faults that do not show themselves until the load is applied, therefore this test needs to be conducted on an energized panel using special precautions.
- Set the multimeter to AC voltage. A range of at least 250 volts is needed for a 120/240‑volt panel.
- Measure the voltage between the breaker’s load terminal and the neutral bar. For a single pole breaker, you should measure a full line voltage of around 120 volts. For double pole breakers, you should be able to measure the 120 volts from each pole to the neutral. If you have taken your measurement of a single pole breaker and it shows significantly lower than 120 volts or drops when you turn on your load, then you could have high resistance inside contacts.
- Measure the voltage drop across the breaker. Using an established load/operation of the circuit, measure between the line side of the circuit breaker (provided you can access it) and the load side of the circuit breaker. You should not observe more than 0.1 Volt of voltage drop across the circuit breaker for proper operation; however, you’ll find that the circuit breaker has developed an internal resistance if you have an observed voltage drop of at least 0.5 Volt, necessitating replacement of the breaker.
The test is considered by many as the only reliable service to find out if a breaker is tripping but has not failed completely. The test should only be performed by a licensed and experienced electrician familiar with working inside an electrical panel with live parts. If the panel is an older style panel with exposed live parts, do not attempt this test.
From the Factory Floor: How Breakers Are Tested in Production
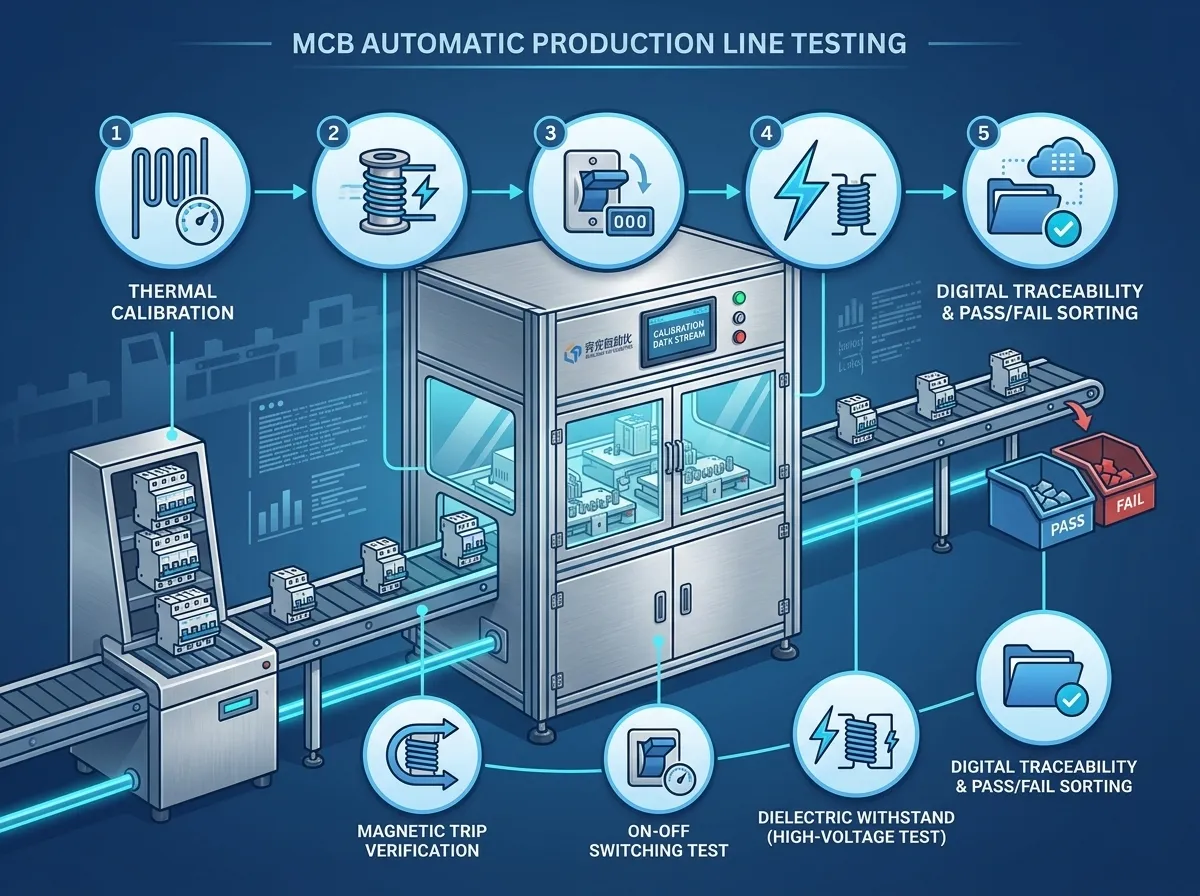
Any circuit breakers that arrive at a customer’s panel will have already passed through their own individual testing process at the manufacturing facility prior to being shipped out. Each production line has a significantly more extensive and better calibrated test than any field testing done; therefore the manufacturer is obligated to ensure all of its products are compliant with those standards at the time of their certification.
An MCB automatic testing system can be created through Benlong Automation with a number of different types of tests performed on every breaker flowing through the test line: Thermal trip calibration, magnetic trip verification, dielectric withstand (high-voltage testing), and an ON-OFF switching test. The breaker feeds into the test line automatically, calibrated, tested, and sorted into pass or fail without an operator touching it during any part of the process. The calibration data is stored digitally for full traceability. This is the upstream test to what an electrician does in the field performing the same electrical tests at a production speed with documented traceable results. The Benlong MCB automatic test line is built for just this purpose combining the calibration, magnetic trip verification, high-voltage withstand, and ON-OFF testing at one integrated test station. For the manufacturer, the difference between investing in this level of testing means the difference between a breaker that may be “OK” to one that has had a proven and documented level of performance.
Recognising the Symptoms of a Bad Circuit Breaker
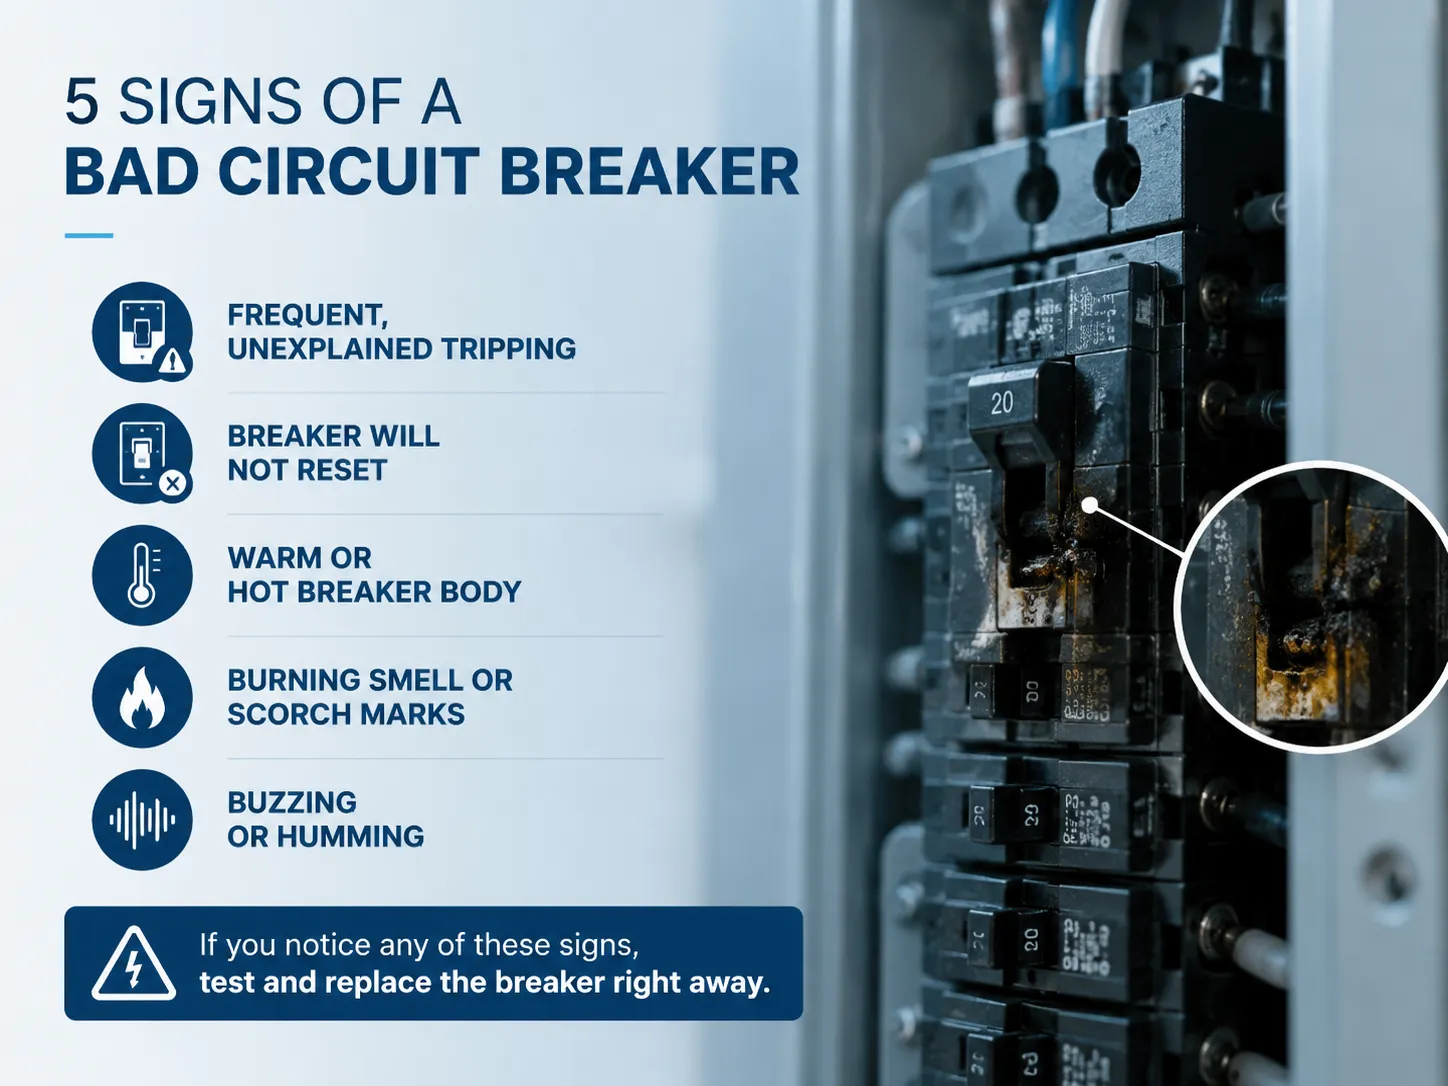
Tests confirm that the symptoms are valid therefore if a breaker is exhibiting any of these following signs they should be tested and replaced right away (without the need to wait for testing) if the symptom severity would warrant this decision.
- Frequent, unexplained tripping. In the event that a circuit breaker continues to trip repeatedly when carrying the same electrical load it previously could carry, there is a possibility that the circuit breaker is out of calibration. The thermal element has weakened over time, or the circuit breaker is firing too early with the magnetic trip.
- Breaker will not reset. The switch will return to its original position or “off” position. Either there is an internal latch fail or the contacts are fused together. The breaker has failed.
- Warm or hot breaker body. When a circuit-breaker feels hot when the current is flowing through it, this means there is some internal resistive heating going on. Heat will be produced through resistive heating due to the full load current flowing through either the breaker contact(s) or at the bus bar connection(s) to that particular breaker, indicating that your circuit-breaker is failing.
- Burning smell or scorch marks. If the breaker shows signs of discoloration, emits an odd smell, or is visibly damaged, this constitutes an emergency. Shut off the main breaker immediately and call an electrician.
- Buzzing or humming. If you hear a loud buzzing noise (different than a low humming), it typically means that there has been an internal arcing of electricity. A continuous low sound may be normal; however, a change in that sound would generally be abnormal.
A bad breaker isn’t always easy to see; for example, a bad breaker may become uncalibrated and then not trip as it should. This could leave your entire circuit unprotected and is considered a hidden danger. This is also a reason why all breakers should be tested, even if they seem like they could work just fine.
How to Extend the Life of a Circuit Breaker
A circuit breaker is a wear item, but a few practices can extend its service life significantly.
- Respect the 80% rule. An exceedance of 80% of the continuous capacity of a circuit breaker is unacceptable. A 20A-rated circuit breaker should not be continuously loaded by more than 16A. Excessive load on the thermal element of a circuit breaker could lead to an extended period of time close to the trip threshold, resulting in an incorrect calibration of the circuit breaker. Article 210.20 of the NEC provides for this requirement regarding continuous loads.
- Avoid repeated short‑circuit interruptions. If a breaker has cleared a significant fault (short-circuit dead; lightning), it has suffered contact erosion. After any major fault, the breaker must thus be checked/replaced.
- Keep the panel dry and clean. Rusted busbars and fused circuits cause corrosion due to humidity/dust. A damp basement panel should be serviced once a year.
- Exercise the breaker handle occasionally. It’s necessary to turn off a circuit breaker both annually and then turn it back on to redistribute internal lubricant to help the internal workings stay flexible. This is especially true for breakers that serve as disconnects from seasonal equipment.
If you need to replace a breaker and are unsure of the correct amperage, our guide on what size circuit breaker you need covers the NEC‑based sizing process for standard and motor loads.
Frequently Asked Questions
How do you test if a breaker is bad?
If you think a circuit breaker has gone bad, first turn off the main breaker, then remove the suspect breaker. With a multimeter measure the resistance across the contacts of the breaker when it is in the ‘ON’ and ‘OFF’ positions. The resistance of the breaker when it is in the ‘ON’ position should be nearly 0 ohms; when in the ‘OFF’ position should indicate an open circuit. A circuit breaker that has a high resistance reading when it is in the ‘ON’ position or a continuity reading when it is in the ‘OFF’ position is defective. Testing the voltage drop under load will also help to determine if the internal resistance of the circuit breaker has increased.
How can you tell if a circuit breaker needs replacing?
If your circuit breaker is continually tripping, doesn’t reset after it trips, has an abnormal heating sensation, emits any buzzing sound, has visible scorch marks on it, fails the tests of resistance or voltage drop, then you’ll need to replace it! If the circuit breaker has cleared a major short circuit, it should also be examined and might need to be replaced.
What is the 80% rule for circuit breakers?
According to the 80% Rule, a circuit breaker should not be used continuously beyond its rated current by more than 80%. For example, a 20-amp circuit breaker should have a maximum of 16 amps of continuous load on it. This is done to protect against overheating, prolong the life of the circuit breaker and it is a requirement for continuous loads when following NEC guidelines.
How to test a 240V breaker with a multimeter?
Remove the main power supply and disconnect the breaker. Once that is done, you can test the two poles independently; measuring resistance from each load terminal to its corresponding bus jaw, they should both be at or near 0 (zero) ohms when they are ON and open (no resistance) when they are OFF. If either pole fails, the entire 240-volt breaker must be replaced. You are not permitted to perform live voltage testing on a 240-volt breaker unless you have a qualified electrical license.
References
- Electrical Safety Foundation International (ESFI) — Home Electrical Safety — Guidance on circuit breaker testing and recognising failing breakers.
- Fluke Corporation — How to Test a Relay with a Multimeter — Techniques applicable to testing circuit breaker contacts and coils.
- Family Handyman — How to Replace a Circuit Breaker — Practical guidance on safe breaker removal and testing.
- NFPA 70 (NEC) — Article 210.20 — Requirements for continuous and non‑continuous loads on overcurrent devices.
Testing a circuit breaker — whether with a multimeter in a basement panel or on an automated production line in a factory — is the only way to know that it will do its job when it is called upon. The field tests described here will identify a failing breaker before it causes a fire or a nuisance outage. The factory tests that a manufacturer performs on every unit, using equipment like Benlong Automation’s testing lines, are what ensure that the breaker you install has been verified from the moment it was built. Both matter, because a breaker that protects a circuit must be trusted absolutely.