benlong


HDPE Injection Molding Processing Guide
When creating a new high-density polyethylene (HDPE) piece — whether it’s bottle caps, crates, pipe fittings, tank components, or household items — it is crucial to get everything right. Due to the forgiving nature of HDPE, it has become one of the most commonly used material where molding is concerned (which explains why it is employed in many products we utilize daily). However, “forgiving” does not mean “flawless.” In fact, if the melt temperature, mold temperature or pressure has been improperly set, you can experience problems of sinking, warping, or shrinking, which can be difficult to solve afterwards. In this article, we address the essential information required to successfully carry out HDPE prototyping: material characteristics, machine specifications, complete processing settings, design guidelines, problems, and cost.
Quick answer:HDPE injection molding is simple if you use essential parameters: melt temperature of 200–280°C (optimum 220°C), mold temperature of 20–70°C (ideally 40–60°C), injection pressure of 70–140 MPa, holding pressure (40–60% of injection pressure), and standard 3-section screw with L/D ratio of 25:1. Usually, pre-drying is not required (HDPE absorbs less than 0.01%), but you can dry it by heating it to 80°C for 1 hour if the material is wet. Shrinkage is a very important parameter since HDPE shrinks by 1.5–3.5%, and since it is one of the highest rates among all plastics, it is critical to compensate mold cavities and maintain even wall thickness. The length of the cooling cycle is from 10 to 30 seconds per millimeter wall thickness. HDPE can bear greater screw speed, it has a good performance in terms of 100% regrind material reuse, and there are no special procedures for purging when it is being shut down.
What Is HDPE and Why Mold It?
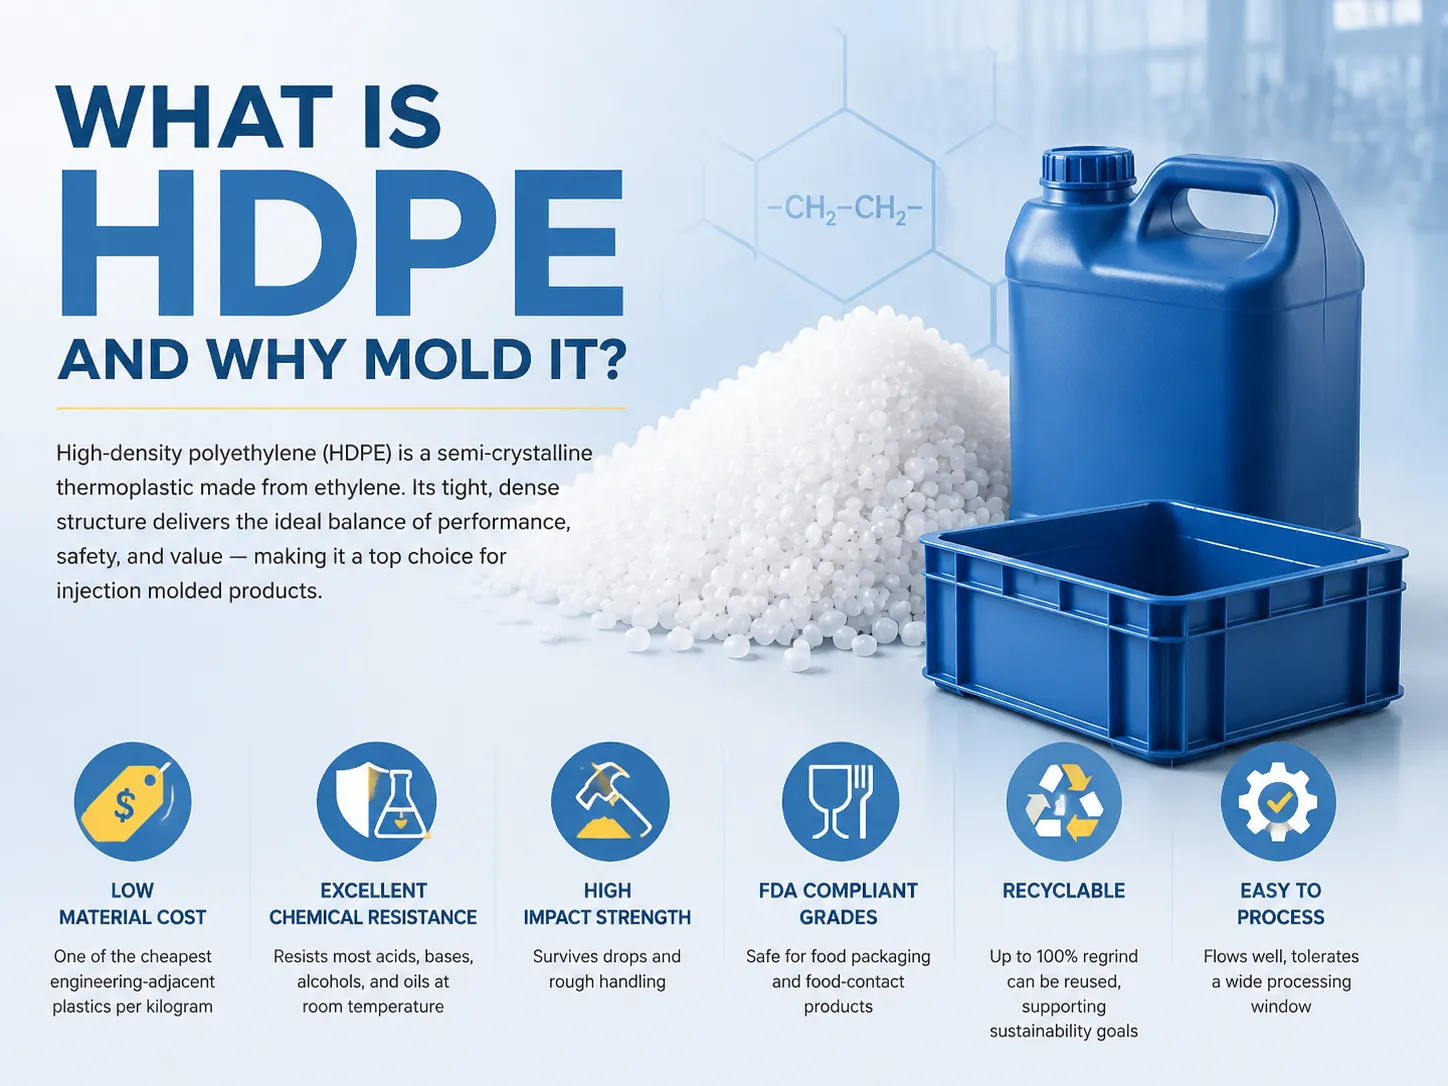
High-density polyethylene (HDPE) is a type of thermoplastic created from ethylene that is semi-crystalline in nature. Thus, HDPE has very little molecular branching, which means it has a compact and dense structure. This is why it has great structural properties, such as a high strength-to-weight ratio, good resistance to chemicals, low rate of moisture absorption.
Reasons to go for HDPE in injection molding:
- Low cost — it is among the least expensive plastics by weight
- Great chemical resistance — it can handle most acids and bases, alcohols, and oils at room temperature
- Excellent impact strength — it can withstand drops and rough treatment
- FDA-approved grades — perfect for food packaging, food contact products, etc.
- Sustainability– recyclable/hundreds of regrinds can be made
- Easy to manufacture and process — gets easily through injection molding process
If you’re new to building molds for plastic parts, understanding how a mold is designed and developed is a prerequisite — our guide to the injection mold development process covers the full journey from design to trial.
HDPE Material Properties That Affect Molding
| Property | Typical Value | Impact on Molding |
|---|---|---|
| Density | 0.93–0.97 g/cm³ | Higher density = higher strength and shrinkage |
| Melt flow index (MFI) | 0.1–28 g/10 min | Low MFI = better impact but harder flow |
| Melting point | 120–135°C | Sets the minimum processing temperature |
| Tensile strength | 20–37 MPa | Excellent mechanical performance |
| Moisture absorption | < 0.01% | No pre-drying normally needed |
| Crystallinity | 60–80% | Slow cooling, affects shrinkage and warpage |
| Molding shrinkage | 1.5–3.5% | Highest among commodity plastics — design molds accordingly |
| UV resistance | Poor without additives | Add UV stabilizers for outdoor products |
There are two essential characteristics of plastics: MFI and shrinkage. Low-MFI grades (substantial molecular weight) exhibit superior impact and process-crack resistance but require greater processing temperatures and pressures. High-MFI grades flow well and can fill thin parts, but become less resistant. Choose grades based on the functions of the plastic part, rather than the cost.
Required Equipment & Machine Setup
Injection Molding Machine
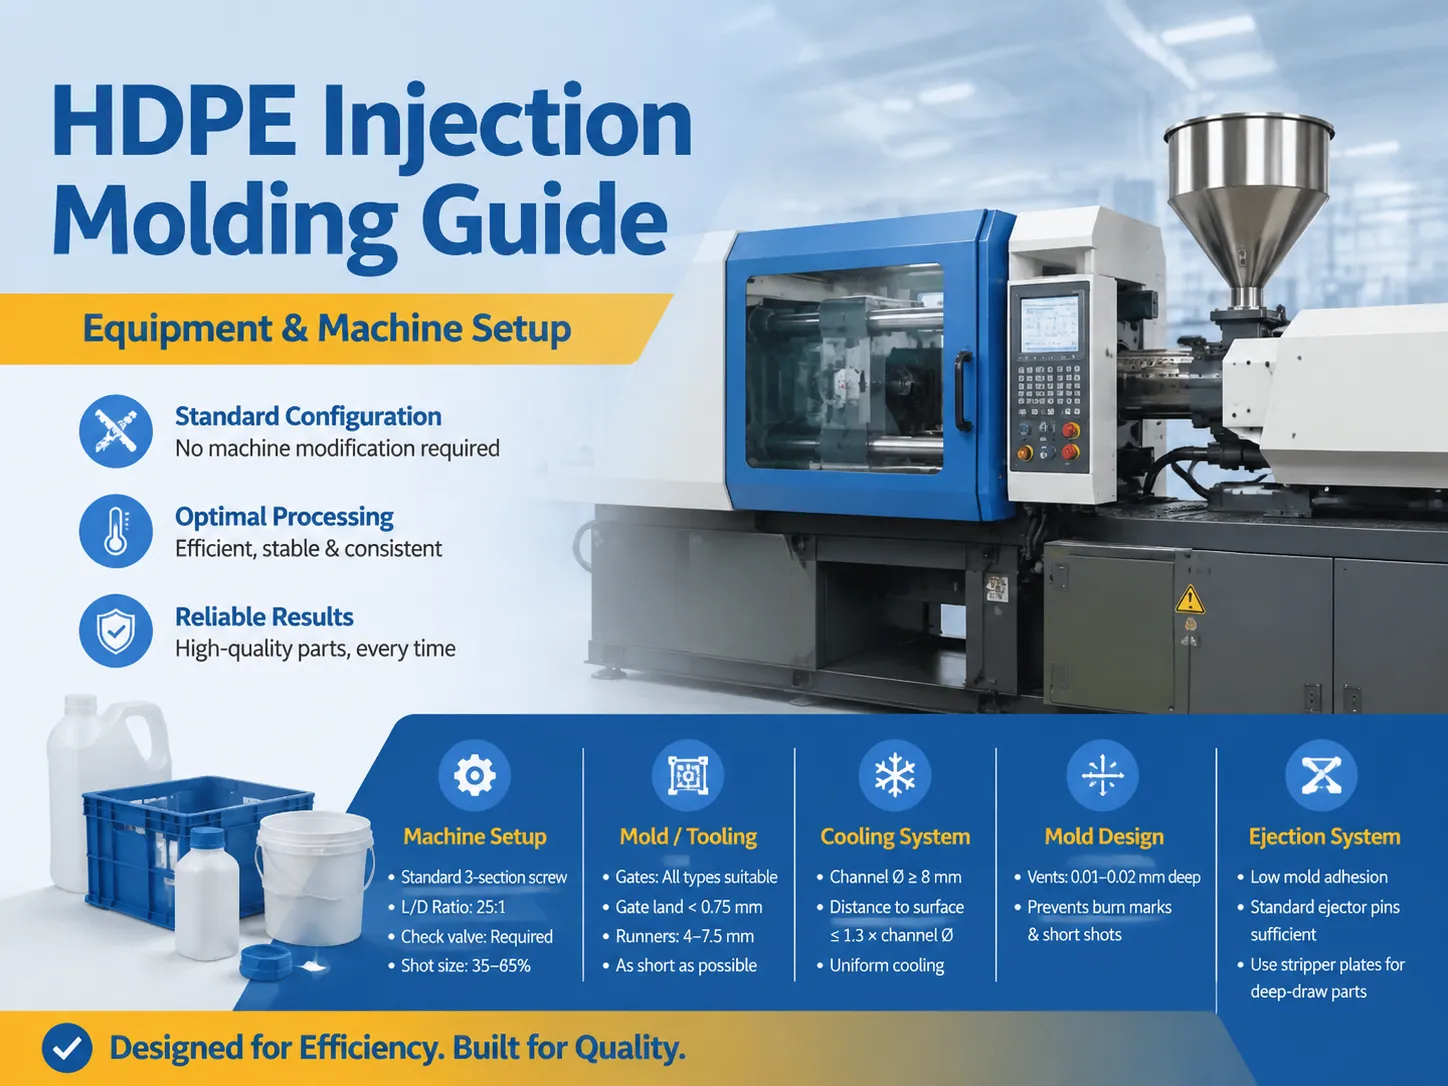
A standard injection molding machine handles HDPE without modification. Recommended configuration:
| Component | Recommendation |
|---|---|
| Screw | Standard 3-section (feed/compression/metering) general-purpose screw |
| Screw L/D ratio | 25:1 (a mixing or shear section is optional for packaging) |
| Nozzle | Straight-through nozzle with shut-off valve |
| Check valve (non-return) | Required to prevent backflow during injection |
| Shot size | Use 35–65% of machine shot capacity for best melt consistency |
Mold / Tooling
- Gates: The gates of any kind are applicable. Pin gates, heated or insulator hot runners as well as internal sprue gates are perfect for making thin wall products. The length of the gate should not exceed 0.75 mm.
- Runners: The diameter should be from 4 to 7.5 mm (usually about 6 mm), but should be as short as possible to avoid any pressure loss and use of material.
- Cooling channels: Their diameter should be not less than 8 mm and they should be placed maximally at the distance of 1.3× of the diameter from the surface of the mold to provide uniform cooling and decrease deviations in the shrinkage.
- Venting: The proper vents (up to 0.01 – 0.02 mm) will help to avoid burn stains and short shots at filling.
- Ejection: HDPE has very low adhesion to molds, which means that ordinary ejector pins will be enough; when it comes to deep-draw parts, stripper plates are used.
For a deeper look at how injection molds are built for precision parts, our article on injection mold manufacturing explains the machining, polishing, and assembly stages.
Complete Processing Parameters
Here are the recommended HDPE injection molding parameters. Start at the recommended mid-point values and adjust based on part quality.
Temperature Settings
| Zone | Recommended Range | Typical Starting Point |
|---|---|---|
| Feed zone (hopper) | 30–50°C | 40°C |
| Barrel zone 1 | 160–250°C | 200°C |
| Barrel zone 2 | 200–300°C | 220°C |
| Barrel zone 3–5 | 220–300°C | 230–240°C |
| Nozzle | 220–300°C | 240°C |
| Melt temperature | 180–280°C | 220°C |
| Mold temperature | 20–70°C | 40–60°C |
Temperature observations: High melting temperatures enhance the flow but could lead to the possibility of thermal degradation (yellowing, smell, and loss of product features). Low temperatures will give incomplete shots and poor surface finish. High-MW grades need to process at 200–250°C. Please use the more elevated temperatures if the wall thickness exceeds 6 mm; if it is below 6 mm, use the lower temperatures.
Pressure & Speed Settings
| Parameter | Recommended Range | Notes |
|---|---|---|
| Injection pressure | 70–140 MPa (up to 180 MPa for thin-wall packaging) | HDPE’s low viscosity often allows lower pressure than engineering plastics |
| Holding pressure | 40–60% of injection pressure | Apply for 50–80% of total cooling time; long hold time controls shrinkage |
| Back pressure | 5–20 MPa | Improves melt consistency and color mixing |
| Injection speed | High recommended; profile speed for large parts | High speed fills thin walls; profiled speed reduces warpage on large flat parts |
| Screw speed | High allowed (linear velocity up to 1.3 m/s) | Low torque requirement |
Cycle & Timing Settings
| Parameter | Recommended Value |
|---|---|
| Shot size (metering stroke) | 0.5–4 D (screw diameter); use ~4D for sufficient melt residence |
| Cushion (residual melt) | 2–8 mm |
| Cooling time | 10–30 seconds per mm of wall thickness |
| Total cycle time | 20–60 seconds typical |
| Regrind usage | Up to 100% (maintain consistent blend ratio) |
Shrinkage & Mold Design Rules
With HDPE, it is shrinkage that presents the primary design challenge. The shrinkage of HDPE is an impressive 1.5–3.5%, which is larger than most other commodity plastics (the shrinkage of PP is around 1.2–2.5 % and that of ABS is just 0.4–0.7 %). Designers have to take this fact into consideration and make the mold cavity larger than the finished part.
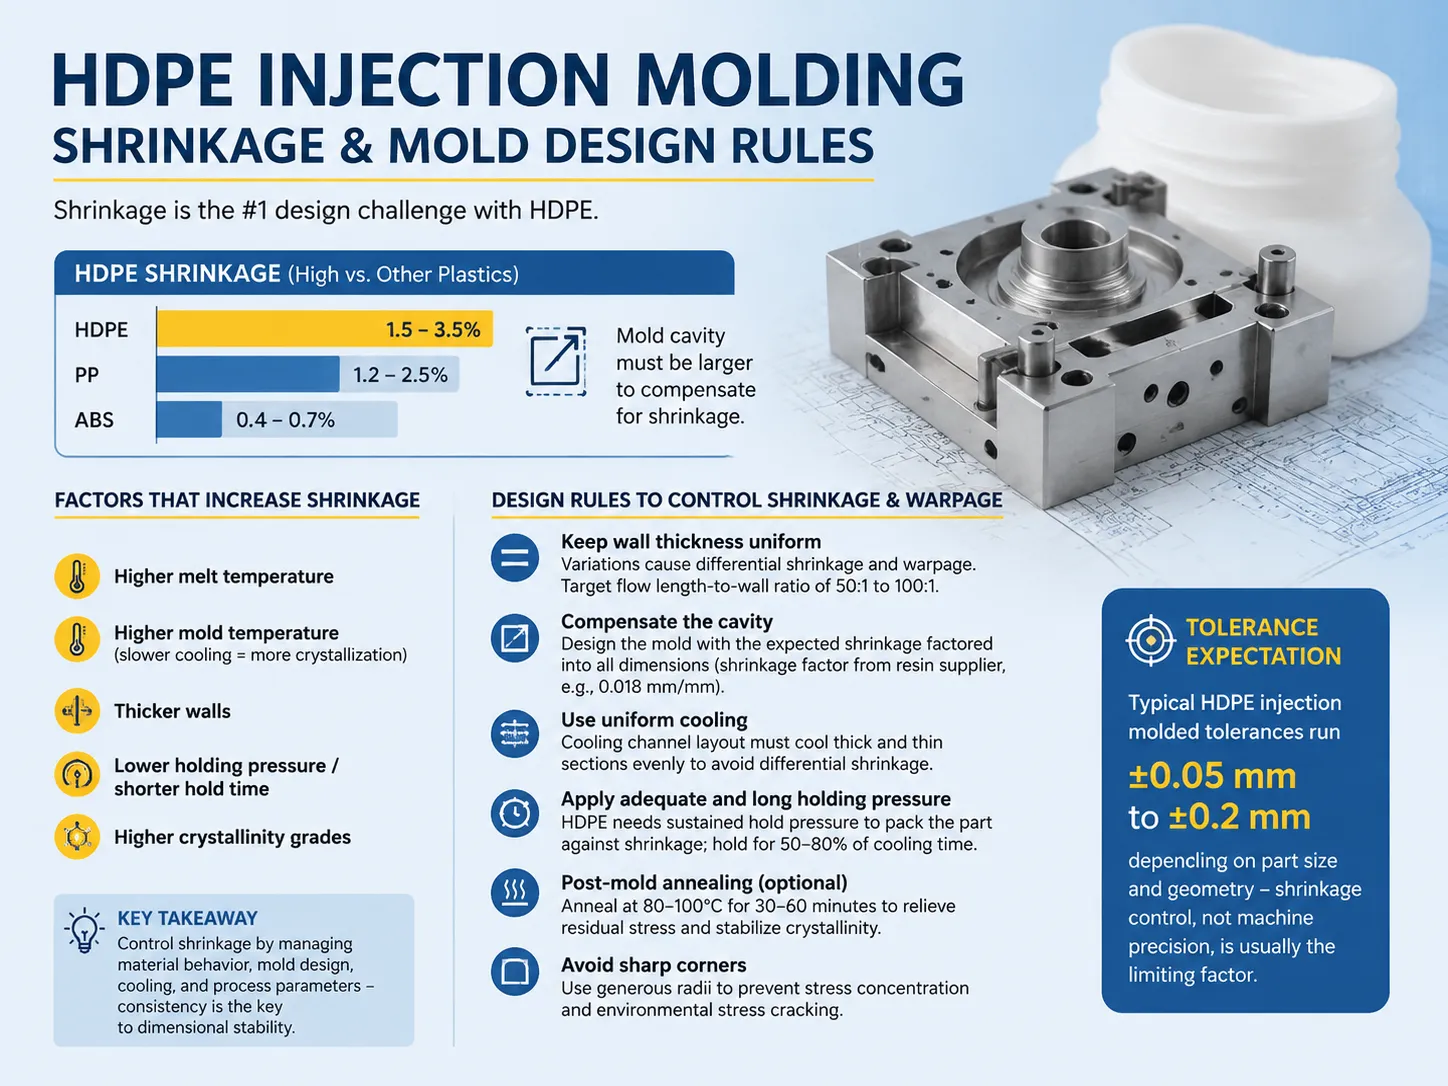
Factors That Increase Shrinkage
- Higher melt temperature
- Higher mold temperature (slower cooling = more crystallization)
- Thicker walls
- Lower holding pressure / shorter hold time
- Higher crystallinity grades
Design Rules to Control Shrinkage & Warpage
- Maintain consistent wall thickness: significant differences in wall thickness lead to uneven shrinkage and warpage of parts. Ideal L/D ratio of flow is from 50:1 to 100:1.
- Adjust cavity: mold design must cope with shrinkage in all sections (the shrinkage value can be given by the resin supplier, for example, 0.018 mm/mm).
- Maintain uniform temperature distribution: cooling system has to supply equal cooling for both the thick and thin areas of the part avoiding shrinkage that may occur in various areas.
- Maintain proper pressure during the holding stage: it is vital to create pressure during the holding stage in production of HDPE; it should be equal to 50-80 % of the time of cooling process.
- Use post-mold annealing (if necessary): the parts with high precision must be subjected to heating at 80-100 degrees Celsius for about 30-60 minutes to decrease internal pressures and provide stability of crystallization.
- Avoid sharp edges while designing mold: huge radius is to be used in the places with high pressure in order to eliminate stress concentration.
Tolerance estimation for HDPE is from ±0.05 mm and up to ±0.2 mm (shrinkage control is more important than machine precision).
Common Defects & How to Fix Them
| Defect | Cause | Fix |
|---|---|---|
| Sink marks | Insufficient holding pressure or hold time; thick sections | Increase hold pressure/time; add ribs; reduce wall thickness; place gates at thickest points |
| Warpage / distortion | Differential shrinkage; non-uniform cooling; high crystallinity | Equalize wall thickness; improve cooling channel layout; profile injection speed; reduce mold temperature |
| Short shots (incomplete fill) | Low melt temperature; low injection pressure; restricted gates; trapped air | Raise melt temp; increase injection pressure/speed; enlarge gates; add vents |
| Flash (burrs) | Excess injection pressure; worn mold parting line; clamp force too low | Reduce injection pressure; increase clamp tonnage; repair mold faces; check vent depth |
| Burn marks | Trapped air compressed at end of fill (“diesel effect”) | Add or deepen vents; reduce injection speed near end of fill |
| Splay / silver streaks | Moisture or contamination in material (rare for HDPE) | Dry at 80°C for 1 hour if wet; purge barrel; check regrind cleanliness |
| Weld lines (weak points) | Melt fronts meeting around inserts or cores | Raise melt temperature; increase injection speed; reposition gates; add overflow wells |
| Sticking in cavity | Over-packing; insufficient draft angle | Reduce hold pressure; increase draft; add ejector pins or stripper plate |
If you’re dealing with more complex molding defects like poor adhesion or contamination, our overmolding troubleshooting guide covers defect diagnosis for multi-material parts, including adhesion failures and color contamination.
Best Practices for Consistent Production
- Maintenance of cleanliness of the material: While HDPE remains unaffected by moisture, it is still prone to dust and contaminants. Good storage practice would advocate for sealing it in bags as well as using clean regrind and covering the hopper.
- Maintaining the same ratio of regrind: For the reuse of regrind, the ratio must be constant, for example, always between 20 and 30% to ensure the same rate of melt flow.
- Change only one variable: While troubleshooting, the variable should be changed one at a time and at least 10 to 15 cycles should be allowed in order to obtain results.
- Monitor the residence time: Small parts on large machines mean long residence time of the melt that leads to degradation of HDPE. That is why shot weight should be at 35% to 65% of the barrel capacity.
- No need of purge during the shutdown: HDPE barely experiences any temperature raise and therefore no need for purging. It can be purged, however, at start-up, either with the same material or with a similar polyolefin.
- Utilize process control: The injection pressure, melt temperature, etc. should be monitored digitally, because it is the stability of parameters that ensures production of consistent parts.
- Keep a record of the process: It should be mentioned that the validated process window should be recorded.
For production lines that need to scale beyond a single press, automation is the natural next step — our overview of manufacturing automation solutions covers robotic part removal, automated inspection, and production-line integration for molding operations.
Typical HDPE Molded Products
| Industry | Typical HDPE Molded Parts |
|---|---|
| Packaging | Bottle caps and closures, crates, pallets, containers, pails |
| Household | Kitchenware, storage boxes, cutting boards, toys, chairs |
| Automotive | Fuel tanks, ventilation ducts, battery boxes, interior trim |
| Construction | Pipe fittings, electrical enclosures, outdoor furniture, manhole covers |
| Food & beverage | Food storage containers, tubs, trays (FDA food-grade grades) |
| Agriculture | Sprayer tanks, feeders, greenhouse parts |
Cost & Cycle Time Expectations
| Item | Typical Range |
|---|---|
| HDPE resin price | $0.65–$1.10 per kg (commodity pricing, varies with market) |
| Mold cost (simple part) | $3,000–$15,000 (single cavity, steel or aluminum) |
| Mold cost (complex multi-cavity) | $20,000–$80,000+ |
| Cycle time (small cap, thin wall) | 15–30 seconds |
| Cycle time (large crate, thick wall) | 60–120 seconds |
| Machine hourly rate | $30–$80/hour (varies by tonnage) |
| Typical tolerance | ±0.05–0.2 mm |
The fact that HDPE is relatively inexpensive and molds quickly means that it is a very affordable plastic with die costs of anywhere from approximately $.01 to $.05 per part in high volume productions of packaging parts. HDPE typically is the cheapest option in any comparison of materials for utilization for new products.
Frequently Asked Questions
Does HDPE need to be dried before injection molding?
No, high-density polyethylene (HDPE) takes in less than 0.01% moisture, meaning it can almost always be processed right out of the bag without needing to dry it – therefore reducing setup times by 2-4 hours for each production run. The only time HDPE needs drying at 80 degrees Celsius for about 60 minutes is when material is poorly stored or has been subject to condensation. One should keep hopper covered and keep HDPE clean to avoid contamination, which is more likely to occur than moisture in this case.
What is the best melt temperature for HDPE injection molding?
HDPE is recommended to be melted at 180-280°C, which normally starts at 220°C. High molecular weight (low MFI) types do best at 200-250°C. If there are short shots or a bad surface finish in the parts, it is advisable to increase the temperature. However, if there is any yellowing, odor, or degradation in the product, the temperature must be lowered. The temperatures in the barrel zones usually range from 200-240°C from zone 1 to the nozzle.
Why does HDPE shrink so much, and how do I control it?
The semi-crystalline nature of HDPE gives rise to greater shrinkage than amorphous materials caused by the orderly structure of polymer chains obtained through cooling. Molding shrinkage is about 1.5 – 3.5%. To manage the shrinkage, the mold should be designed with the shrinkage factor taken into account, the uniformity of wall thickness maintained at all points, and pressure of 40% to 60% for 50% to 80% of the cooling time used together with cooled uniform cooling. Post-mold heating at 80 to 100 °C provides a further help in stabilizing dimensions of tight-tolerance components and requires from half an hour to one hour of processing time.
What injection molding machine do I need for HDPE?
A typical injection molding machine with a standard 3-section screw (L/D 25:1), a shut-off nozzle, and a non-return valve can easily handle HDPE. HDPE has low melt viscosity, so lower injection pressures (70–120 MPa) are required than with engineering plastics. As high screw speeds are allowed (linear velocity can be even 1.3 m/s), in case of consistency in melt quality it is advisable to size the shot at 35–65% of barrel capacity and set the metering stroke of about 4 screw diameters.
Can HDPE regrind be reused in injection molding?
That’s right—HDPE is one of the most recyclable thermoplastics, with the potential for up to 100% regrind usage in various applications. To achieve the best performance, that’s why you must ensure the regrind blend ratio is kept consistent (most molders usually use around 20-30% regrind blended with virgin resin) and regrind is free of contamination. Unlike more conventional types of recycle materials, regrind in case of HDPE is not always approved for food contact applications.
References
- ASTM International — Publishes ASTM D4976 (polyethylene molding and extrusion materials) and related test methods for HDPE properties like density, MFI, and tensile strength.
- ISO (International Organization for Standardization) — Publishes ISO 17855-1/-2 for polyethylene molding materials, defining property classes and test methods.
- Plastics Technology Magazine — Industry publication covering practical HDPE processing data, parameter charts, and troubleshooting advice for injection molders.
- ENGEL — Major injection molding machine manufacturer; their processing guides document machine setup and parameter recommendations for polyolefins like HDPE.
- KraussMaffei — Injection molding machine manufacturer with published processing guidance and screw/barrel recommendations for polyethylene grades.
- FDA Food Contact Substances — Regulatory reference confirming food-grade HDPE grades meet FDA requirements for direct food contact applications.
Injection molding of HDPE is a simple process that is inexpensive, if you follow some important tips. A few points to keep in mind:
- Parameters: Melt should be kept anywhere between 200°C and 280°C (start with 220°C), mold temperature should be kept between 20°C and 70°C (sweet spot is between 40°C and 60°C), injection should be done between 70 MPa and 140 MPa and holding pressure should be set between 40% and 60%.
- No drying required – You can skip drying because HDPE has moisture absorption of less than 0.01%, resulting in speed up of all operations. Just keep it clean.
- Shrinkage is the toughest problem – A shrinkage of 1.5% to 3.5% needs to be accounted for in the mold, walls need to be uniform, and enough pressure needs to be applied.
- Ordinary equipment is enough – As a pool of general machines can be used, there is no need to use expensive equipment as much lower pressure is required in HDPE.
- You can avoid defects – sink marks, warps, and short shots all have very clear problems and solutions.
- Low cost – resin is not that expensive, cycles are fast (20-60 seconds), and you can use up to 100% regrind.
Use this manual, and you should get good quality runs with HDPE.